• Sponsors

  • Categories

  • Archives

  • Sponsors

DIY I Spy Bottle

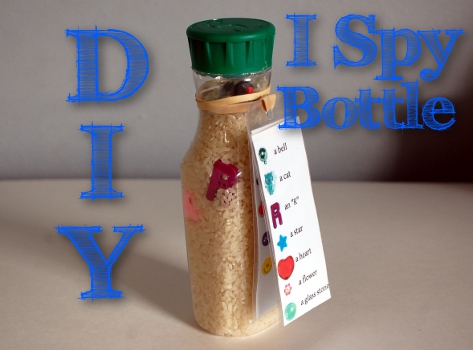
It’s easier than you may think to create your own I Spy bottle. They are excellent for quietly occupying children, and turning the bottle over and over to search for the small objects hidden inside can be very calming.

So, without further ado, here’s what you do!

DIY I Spy Bottle

You Will Need:

  • A small bottle of clear, sturdy plastic, with a lid
  • Rice
  • A collection of small, random items
  • Glue (I used a glue gun)
  • Rubber band or string (optional – to fasten tag)
  • Paper (optional – for tag)
  • Wide Clear Tape (optional – for tag)
  • Hole Punch (optional – for tag)

First, remove any labels from your bottle and remove the sticker goo; allow to dry completely.

Next, assemble the objects. At first I did not think that I’d be able to assemble enough items for an I Spy, but the more I poked around, the more I saw. Here are some of the things I used or thought about using for the I Spy bottle: a googly eye, a pompom, some buttons (plain and fancy shaped), glass stones, plastic gems, a small seashell, a jingle bell, beads, 3D stickers (I stuck them back to back to avoid having them stick to the rice), small shaped erasers, a stray puzzle piece, a rhinestone, an abandoned game piece, a penny. Look around! You’ll find something to put in.

If you want to make a picture tag, take a picture of your objects at this point. I lined them up on a piece of white paper and took a photo. If you just want to make a regular list, write down what objects you are putting in. If you’re not providing a list, skip this step.

Place objects in the bottle and cover with rice. Be sure to leave some space at the top of the bottle; the more empty space there is the easier it will be to uncover the objects. Close your bottle and test it out, adjusting rice levels until you are satisfied.

Glue the lid shut. Be thorough.

Prepare your list. This can be as simple as writing on a piece of paper, or typing the words next to the pictures. Cut your list to size and cover on both sides with tape to protect it. Put a hole in the top, string the rubber band or string through the hole, and fasten to the neck of the bottle. You’re done!

Facebooktwitterredditpinterestlinkedinmailby feather

Cheap and Easy Busy Bag: Sticker Letters

Busy Bags are great! Little packets of prepared activities in portable form, they are perfect for packing for travel or waiting rooms or restaurants. Busy bags can be simple or elaborate, cheap or expensive. Here’s another example of a cheap busy bag that’s quick to put together.

Cheap and Easy Busy Bag: Sticker Letters

Estimated Cost Per Bag: < $1.50* Estimated Time to Make: < 10 minutes Materials:

  • Package of small stickers (I got a pack of 600 stars at the Dollar Tree)
  • Paper
  • Printer
  • Stapler (optional)

This busy bag was inspired by this post from Confessions of a Homeschooler!

All you need to do to prepare this busy bag is print out this tracing alphabet, cut the sheets into quarters, and staple them together. Stick them in a ziploc with a pack of stickers, and you’re done!

To play, have the children place the stickers along the letters. Simple!

*Cost per bag is estimated based on amount of materials used. If you are only making one bag and have to go out and buy all the materials for the bag, cost of materials will be higher, but you will have leftovers.

Facebooktwitterredditpinterestlinkedinmailby feather

Cheap and Easy Busy Bag: Button Snake

Busy Bags are great! Little packets of prepared activities in portable form, they are perfect for packing for travel or waiting rooms or restaurants. Busy bags can be simple or elaborate, cheap or expensive. Here’s another example of a cheap busy bag that’s quick to put together.

Cheap and Easy Busy Bag: Button Snake

Estimated Cost Per Bag: < $1* Estimated Time to Make: < 20 minutes Materials:

  • Scraps of felt in different colors
  • Scissors
  • 1 large button
  • About 1 foot length of wide ribbon (best if ribbon is the same width or slightly smaller than your button)
  • Needle and thread

Sew button to one end of ribbon. Cut out a bunch of squares from the felt, fold in half and snip a hole in the middle for the button to pass through. (I checked the first few with the button, but you get good at estimating the right size after a while.) I decided to fold over a piece of felt and sew it to the other end of the ribbon to act as a stop, because when I tested it my felt slid right off the end. This way the felt squares stay on, but are easy to remove.

*Cost per bag is estimated based on amount of materials used. If you are only making one bag and have to go out and buy all the materials for the bag, cost of materials will be higher, but you will have leftovers.

Facebooktwitterredditpinterestlinkedinmailby feather